1.1. 场景
在和开发人员做优化的时候,讨论最多的应该是结合应用场景编写出合适的SQL。并培训开发应该如何编写SQL让MySQL的性能尽量好。但是有一些的场景对于SQL的优化是行不通的。
打个比方,产品有这样的需求:针对每个商品实时显示销售者的销售量,并且按销售量做排序,还要实现 分页。这个需求看上去很简单,实现起来也很容易。无非就是对三张表(seller、goods、orders)进行查询、聚合、排序。但是对于上亿订单量来说,这样查询简直就是一个噩梦。
分析:这边主要是需要按销售量来进行排序,这样的操作在这里就比较可怕。如果没有这个的话,我们的按下面步骤来写SQL,MySQL跑起来就很爽:
- 按分页需求,先查出销售者的个数(如:100个销售着,去10个)。
- 通过1取出的销售者到orders中查询订单并GROUP BY。
- 通过2中的orders中的goods id 取出商品信息。
可惜的是我们不是产品,不能按照我们的意愿来。当然,最好的办法就是说服产品,干掉类似这样的需求。或改变一种方式来实现这中需求,如:不要实时的展示。可是说服产品和顶在头上的人谈何容易啊,也许是关注的东西是不一样的吧。
1.2. 解决方案
首先要说明一些,像这样统计的计算能不实时就不实时。我们应该把OLAP的操作和OLTP的操作尽量解耦。来做。如白天我们关注的是OLTP(就是大家普通在用的应用程序),晚上我们关注的OLAP(Hadoop实现)。
这是我们的奇葩需求需要实时,所以Hadoop都是用不上的了。这时我们就需要用气实时计算的系统。现在业界应该有两个实时计算系统比较流行:Storm、Spark。这边我选用了使用Storm来作为我们的方案。这边选择Storm的原因主要也就是之前接触过,比较熟悉上手比较快。
当然这边我们要需要用到其他的主键:
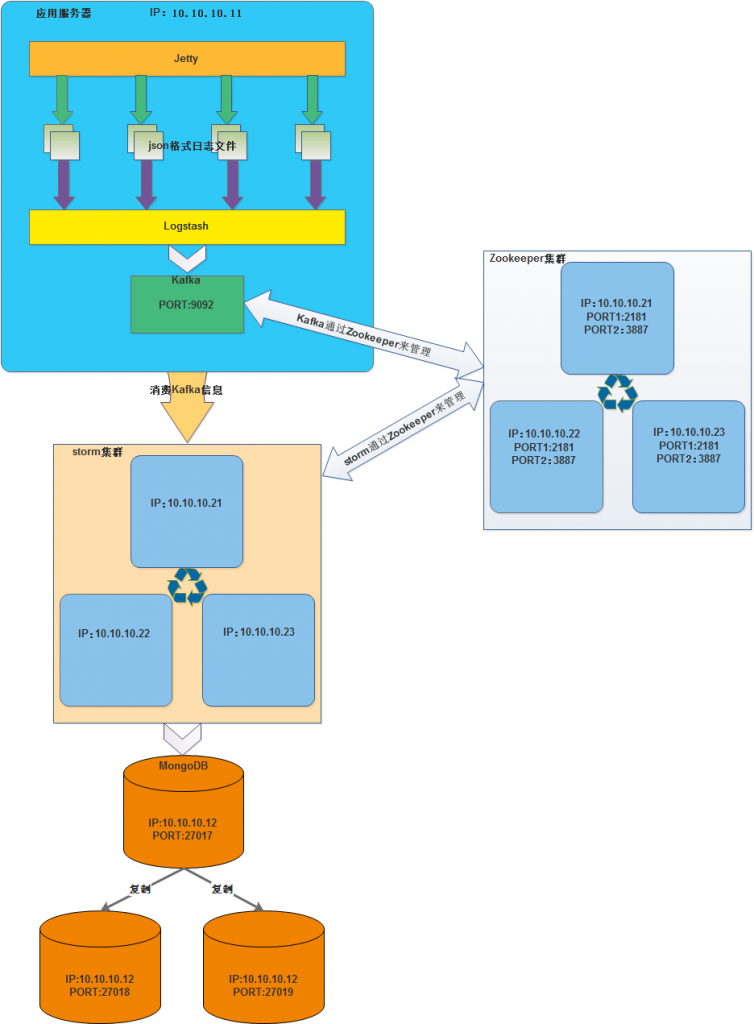
- Logstash:主要也就是用来收集日志。这边我们将交易一笔订单记录都会化成json格式输出到日志文件中。之前也考虑过使用Flume,但是Flume没有Logstash来的实时。
- Kafka:主要是为了接受Logstash传过来的信息,并将它持久化和提供给Storm来使用。说明一下:有些系统会将Kafka放入程序就使用,就是说订单完成时将订单json信息直接发送给Kafka。我们这边多一层Logstash的目的是为了让应用系统和Kafka进行解耦。如果Kafka挂掉或者网络出现问题。不会影响到应用系统的正常运行。
- Storm:接收Kafka中的信息进行分析计算出想要的数据。
- MongoDB:主要是为了存储从Storm中分析完的数据。
- Zookeeper:用来管理Kafka和Storm用的。
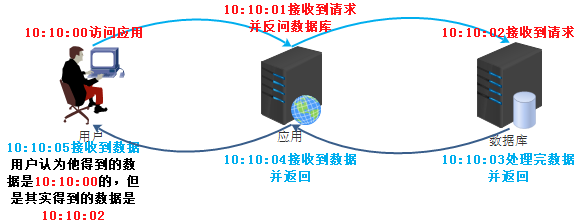
在使用这样的架构之前希望大家能理解一下“实时”这个概念:其实无论在什么应用程序中基本没有实时能完成的。只是电脑运行的快,让你误认为是实时的。所以,这边我们还是准实时。
实时理解的图:

1.3. 实时计算架构部署图

1.4. 架构部署
1.4.1. 环境说明
部署演示使用的是VirtualBox虚拟机,总共启用了5台虚拟机(可以根据自己的机器配置而定,我的配置:i3、12G内存、固态硬盘250G)。
系统应用部署信息
| 操作系统 | IP | 部署软件 | 端口 |
| Centos7.2 | 10.10.10.11 | Logstash | |
| Kafka | 9092 | ||
| ~ | 10.10.10.12 | MongoDB | 27017、27018、27019 |
| ~ | 10.10.10.21 | Zookeeper | 2181、3887 |
| Storm | |||
| ~ | 10.10.10.22 | Zookeeper | 2181、3887 |
| Storm | |||
| ~ | 10.10.10.23 | Zookeeper | 2181、3887 |
| Storm |
这边我就不部署Jetty了,到时候我使用变相的方式来向日志文件中输入json格式数据。
22.4.2. 统一配置
这边5台机子的有统一的hosts文件,并且都需要配置好JDK:
|
1
2
3
4
5
6
7
8
9
10
11
|
[root@storm_1 conf]# cat /etc/hosts
127.0.0.1 localhost localhost.localdomain localhost4 localhost4.localdomain4
10.10.10.21 storm_1
10.10.10.22 storm_2
10.10.10.23 storm_3
10.10.10.11 normal_11
10.10.10.12 normal_12
[root@normal_11 local]# java -version
java version “1.7.0_79”
Java(TM) SE Runtime Environment (build 1.7.0_79–b15)
Java HotSpot(TM) 64–Bit Server VM (build 24.79–b02, mixed mode)
|
22.4.3. 部署Zookeeper
因为这边我们部署的是Zookeeper集群因此在3台机子上的操作步骤都是一样的:这边我以操作其中一台(10.10.10.21 storm_1)机子为例。
- 到官网下载软件(zookeeper-3.4.6.tar.gz)
- 将软件解压到 /usr/local/ 目录下
|
1
2
3
4
5
|
[root@storm_1 local]# tar zookeeper-3.4.6.tar.gz -C /usr/local
[root@storm_1 local]# pwd
/usr/local
[root@storm_1 local]# ls -la
drwxr–xr–x. 10 1000 1000 4096 Feb 20 2014 zookeeper–3.4.6
|
- Zookeeper配置文件
如果没有/usr/local/zookeeper-3.4.6/conf/zoo.cfg配置文件则新建一个。
|
1
2
3
4
5
6
7
8
9
10
11
12
13
14
15
16
17
18
19
20
21
22
23
24
25
26
27
28
29
30
31
32
33
34
35
36
|
[root@storm_1 conf]# pwd
/usr/local/zookeeper–3.4.6/conf
[root@storm_1 conf]# cat zoo.cfg
# The number of milliseconds of each tick
tickTime=2000
# The number of ticks that the initial
# synchronization phase can take
initLimit=10
# The number of ticks that can pass between
# sending a request and getting an acknowledgement
syncLimit=5
dataDir=/u01/zookeeper/data
dataLogDir=/u01/zookeeper/data_log
# the directory where the snapshot is stored.
# do not use /tmp for storage, /tmp here is just
# example sakes.
# the port at which the clients will connect
clientPort=2181
# the maximum number of client connections.
# increase this if you need to handle more clients
#maxClientCnxns=60
#
# Be sure to read the maintenance section of the
# administrator guide before turning on autopurge.
#
# http://zookeeper.apache.org/doc/current/zookeeperAdmin.html#sc_maintenance
#
# The number of snapshots to retain in dataDir
#autopurge.snapRetainCount=7
# Purge task interval in hours
# Set to “0” to disable auto purge feature
#autopurge.purgeInterval=1
server.1 = storm_1:2887:3887
server.2 = storm_2:2887:3887
server.3 = storm_3:2887:3887
|
- 创建相关需要的目录
|
1
2
3
4
5
6
|
[root@storm_1 zookeeper]# mkdir -p /u01/zookeeper/data
[root@storm_1 zookeeper]# mkdir -p /u01/zookeeper/data_log
[root@storm_1 zookeeper]# ll /u01/zookeeper/
total 0
drwxr–xr–x 3 root root 33 Apr 19 00:23 data
drwxr–xr–x 3 root root 22 Apr 2 12:36 data_log
|
- 创建myid文件
下面的命令应该在不同的机器上执行
|
1
2
3
4
5
6
|
# 在 10.10.10.21 storm_1 机器上执行
[root@storm_1 zookeeper]# echo 1 > /u01/zookeeper/data/myid
# 在 10.10.10.21 storm_2 机器上执行
[root@storm_2 zookeeper]# echo 2 > /u01/zookeeper/data/myid
# 在 10.10.10.21 storm_3 机器上执行
[root@storm_3 zookeeper]# echo 3 > /u01/zookeeper/data/myid
|
- 启动Zookeeper
分表在三台机子上都要执行下面命令
|
1
|
[root@sotrm_1 ~]# /usr/local/zookeeper-3.4.6/bin/zkServer.sh start
|
- 查看Zookeeper状态
|
1
2
3
4
|
[root@storm_1 zookeeper]# /usr/local/zookeeper-3.4.6/bin/zkServer.sh status
JMX enabled by default
Using config: /usr/local/zookeeper–3.4.6/bin/../conf/zoo.cfg
Mode: follower
|
- 客户端链接Zookeeper进行验证
|
1
2
3
4
5
6
7
|
[root@storm_1 zookeeper]# /usr/local/zookeeper-3.4.6/bin/zkCli.sh -timeout 5000 -r -server storm_1:2181
Connecting to storm_1:2181
... omit ...
WatchedEvent state:SyncConnected type:None path:null
[zk: storm_1:2181(CONNECTED) 0] ls /
[consumers, config, isr_change_notification, admin, brokers, zookeeper, controller_epoch]
|
以上就算是部署好了Zookeeper集群了。
22.4.4. 部署Kafka
按照前面规划的我们应该将Kafka部署在(10.10.10.12 normal_12)机子上。
- 到官网下载Kafka(10-0.9.0.0.tgz)
- 将Kafka解压到/usr/local目录下,并从命令为kafka
|
1
2
3
4
5
|
[root@normal_11 local]# tar -zxf kafka_2.10-0.9.0.0.tgz -C /usr/local
[root@normal_11 local]# mv /usr/local/kafka_2.10-0.9.0.0 /usr/local/kafka
[root@normal_11 local]# cd /usr/local
[root@normal_11 local]# ls -la
drwxr–xr–x 7 root root 4096 Apr 18 22:41 kafka
|
- 设置Kafka配置文件
|
1
2
3
4
5
6
7
8
9
10
11
12
13
14
15
16
17
18
19
20
|
[root@normal_11 config]# pwd
/usr/local/kafka/config
[root@normal_11 config]# cat server.properties
broker.id=0
listeners=PLAINTEXT://:9092
num.network.threads=3
num.io.threads=8
socket.send.buffer.bytes=102400
socket.receive.buffer.bytes=102400
socket.request.max.bytes=104857600
log.dirs=/u01/kafka–logs
num.partitions=1
num.recovery.threads.per.data.dir=1
log.retention.hours=168
log.segment.bytes=1073741824
log.retention.check.interval.ms=300000
log.cleaner.enable=false
zookeeper.connect=storm_1:2181,storm_2:2181,storm_3:2181
zookeeper.connection.timeout.ms=6000
|
- 创建Kafka相关目录
|
1
|
[root@normal_11 config]# mkdir -p /u01/kafka-logs
|
- 启动Kafka
|
1
2
3
|
[root@normal_11 config]# /usr/local/kafka/bin/kafka-server-start.sh \
/usr/local/kafka/config/server.properties > /u01/kafka–logs/kafka.out 2>&1 &
[1] 3656
|
- 创建test topic
|
1
2
3
4
5
6
|
[root@normal_11 config]# /usr/local/kafka/bin/kafka-topics.sh \
—create \
—zookeeper storm_1:2181 \
—replication–factor 1 \
—partitions 1 \
—topic test
|
- 查看创建的topic
|
1
2
3
4
|
[root@normal_11 config]# /usr/local/kafka/bin/kafka-topics.sh \
—list \
—zookeeper storm_1:2181
test
|
- 新建一个session,开启Kafka消费者客户端
|
1
2
3
4
|
[root@normal_11 config]# /usr/local/kafka/bin/kafka-console-consumer.sh \
—zookeeper storm_1:2181 \
—topic test \
—from–beginning
|
- 新建一个session,开启Kafka生产者客户端,并生产一个消息。
|
1
2
3
4
5
|
/usr/local/kafka/bin/kafka–console–producer.sh \
—broker–list localhost:9092 \
—topic test
this is message 1
|
在消费者的session中能看到同时也出现了 “this is message 1”这个消息
22.4.5. 部署Logstash
按照前面规划的我们应该将Kafka部署在(10.10.10.12 normal_12)机子上。这边我们使用Logstash监听/tmp/orders.log文件,并且将Kafka作为它的输出。
- 到官网下载Logstash(logstash-2.3.1.tar.gz)
- 将Logstash解压到/usr/local/目录下
|
1
2
3
4
5
|
[root@normal_11 local]# tar -zxf logstash-2.3.1.tar.gz
[root@normal_11 local]# mv logstash-2.3.1 /usr/local/logstash
[root@normal_11 local]# cd /usr/local
[root@normal_11 local]# ll
drwxr–xr–x 5 root root 4096 May 8 21:35 logstash
|
- 设置Logstash配置文件
|
1
2
3
4
5
6
7
8
9
10
11
12
13
|
[root@normal_11 logstash]# mkdir -p /usr/local/logstash/conf
[root@normal_11 logstash]# cat /usr/local/logstash/conf/logstash-kafka.conf
input {
file {
path => “/tmp/orders.log”
}
}
output {
kafka {
bootstrap_servers => “normal_11:9092”
topic_id => “test”
}
}
|
- 启动Logstash agent
|
1
2
3
4
|
[root@normal_11 config]# /usr/local/logstash/bin/logstash agent \
—verbose \
–f /usr/local/logstash/conf/logstash–kafka.conf \
—log /tmp/logstash.log &
|
- 向/tmp/orders.log中输入一个json字符串
|
1
|
[root@normal_11 tmp]# echo ‘{“order_price”:20, “good_name”:”good_1″, “seller_id”:1}’ >> /tmp/orders.log
|
再之前启动的Kafka消费者客户端会出现如下消息
|
1
|
{“message”:“{\”order_price\”:20, \”good_name\”:\”good_1\”, \”seller_id\”:1}”,“@version”:“1”,“@timestamp”:“2016-05-08T13:59:45.080Z”,“path”:“/tmp/orders.log”,“host”:“normal_11”}
|
22.4.6. 部署MongoDB
这边我们MongoDB部署在(10.10.10.12 normal_12)机子上。并且采用的是复制的形式。
- 官网下载MongoDB(mongodb-linux-x86_64-rhel70-3.2.5.tgz)
- 解压MongoDB到/usr/local/目录下
|
1
2
|
[root@normal_12 soft]# tar -zxf mongodb-linux-x86_64-rhel70-3.2.5.tgz
[root@normal_12 soft]# mv mongodb-linux-x86_64-rhel70-3.2.5 /usr/local/mongodb
|
- 创建MongoDB的相关目录
|
1
2
3
4
5
6
7
8
9
10
11
12
13
14
15
16
17
18
19
20
21
22
23
|
[root@normal_12 soft]# mkdir -p /u01/mongodb_2701{7,8,9}/{data,logs,tmp}
[root@normal_12 soft]# cd /u01
[root@normal_12 soft]# ll *
mongodb_27017:
total 6396
drwxr–xr–x 4 root root 4096 May 8 02:07 data
drwxr–xr–x 2 root root 41 Apr 30 22:17 logs
–rw–r—r— 1 root root 658 May 7 15:21 mongodb.yaml
drwxr–xr–x 2 root root 24 Apr 30 22:17 tmp
mongodb_27018:
total 20
drwxr–xr–x 2 root root 6 May 7 10:04 data
drwxr–xr–x 2 root root 24 May 1 20:42 logs
–rw–r—r— 1 root root 662 May 7 11:14 mongodb.yaml
drwxr–xr–x 2 root root 24 May 1 20:42 tmp
mongodb_27019:
total 20
drwxr–xr–x 2 root root 6 May 7 10:04 data
drwxr–xr–x 2 root root 24 May 1 20:55 logs
–rw–r—r— 1 root root 662 May 7 11:15 mongodb.yaml
drwxr–xr–x 2 root root 24 May 1 20:55 tmp
|
- 分别在/u01/mongodb_27017、/u01/mongodb_27018、/u01/mongodb_27019中创建配置文件和启动脚本
- /u01/mongodb_27017中的配置文件和启动脚本
|
1
2
3
4
5
6
7
8
9
10
11
12
13
14
15
16
17
18
19
20
21
22
23
24
25
26
27
28
29
30
31
32
33
34
35
36
37
38
39
40
41
42
43
44
45
|
[root@normal_12 u01]# cat /u01/mongodb_27017/mongodb.yaml
# http://docs.mongoing.com/manual-zh/reference/configuration-options.html
systemLog:
destination: file
path: /u01/mongodb_27017/logs/mongodb.log
logAppend: true
logRotate: reopen
storage:
dbPath: /u01/mongodb_27017/data
engine: wiredTiger
journal:
enabled: true
processManagement:
fork: true
pidFilePath: /u01/mongodb_27017/tmp/mongodb.pid
net:
bindIp: 10.10.10.12
port: 27017
unixDomainSocket:
enabled: false
operationProfiling:
mode: slowOp
slowOpThresholdMs: 100
replication:
replSetName: rs_12
enableMajorityReadConcern: true
[root@normal_12 u01]# cat /u01/mongodb_27017/start_mongodb.sh
#!/usr/bin/env bash
/usr/local/mongodb/bin/mongod \
—config=/u01/mongodb_27017/mongodb.yaml
[root@normal_12 u01]# cat /u01/mongodb_27017/stop_mongodb.sh
#!/usr/bin/env bash
/usr/local/mongodb/bin/mongod \
—config /u01/mongodb_27017/mongodb.yaml \
—shutdown
[root@normal_12 u01]# cat /u01/mongodb_27017/client_mongodb.sh
#!/usr/bin/env bash
/usr/local/mongodb/bin/mongo 10.10.10.12:27017
|
- /u01/mongodb_27018中的配置文件和启动脚本
|
1
2
3
4
5
6
7
8
9
10
11
12
13
14
15
16
17
18
19
20
21
22
23
24
25
26
27
28
29
30
31
32
33
34
35
36
37
38
39
40
41
42
43
44
45
|
[root@normal_12 u01]# cat /u01/mongodb_27018/mongodb.yaml
# http://docs.mongoing.com/manual-zh/reference/configuration-options.html
systemLog:
destination: file
path: /u01/mongodb_27018/logs/mongodb.log
logAppend: true
logRotate: reopen
storage:
dbPath: /u01/mongodb_27018/data
engine: wiredTiger
journal:
enabled: true
processManagement:
fork: true
pidFilePath: /u01/mongodb_27018/tmp/mongodb.pid
net:
bindIp: 10.10.10.12
port: 27018
unixDomainSocket:
enabled: false
operationProfiling:
mode: slowOp
slowOpThresholdMs: 100
replication:
replSetName: rs_12
enableMajorityReadConcern: true
[root@normal_12 u01]# cat /u01/mongodb_27018/start_mongodb.sh
#!/usr/bin/env bash
/usr/local/mongodb/bin/mongod \
—config=/u01/mongodb_27018/mongodb.yaml
[root@normal_12 u01]# cat /u01/mongodb_27018/stop_mongodb.sh
#!/usr/bin/env bash
/usr/local/mongodb/bin/mongod \
—config /u01/mongodb_27018/mongodb.yaml \
—shutdown
[root@normal_12 u01]# cat /u01/mongodb_27018/client_mongodb.sh
#!/usr/bin/env bash
/usr/local/mongodb/bin/mongo 10.10.10.12:27018
|
- /u01/mongodb_27019中的配置文件和启动脚本
|
1
2
3
4
5
6
7
8
9
10
11
12
13
14
15
16
17
18
19
20
21
22
23
24
25
26
27
28
29
30
31
32
33
34
35
36
37
38
39
40
41
42
43
44
45
|
[root@normal_12 u01]# cat /u01/mongodb_27019/mongodb.yaml
# http://docs.mongoing.com/manual-zh/reference/configuration-options.html
systemLog:
destination: file
path: /u01/mongodb_27019/logs/mongodb.log
logAppend: true
logRotate: reopen
storage:
dbPath: /u01/mongodb_27019/data
engine: wiredTiger
journal:
enabled: true
processManagement:
fork: true
pidFilePath: /u01/mongodb_27019/tmp/mongodb.pid
net:
bindIp: 10.10.10.12
port: 27019
unixDomainSocket:
enabled: false
operationProfiling:
mode: slowOp
slowOpThresholdMs: 100
replication:
replSetName: rs_12
enableMajorityReadConcern: true
[root@normal_12 u01]# cat /u01/mongodb_27019/start_mongodb.sh
#!/usr/bin/env bash
/usr/local/mongodb/bin/mongod \
—config=/u01/mongodb_27019/mongodb.yaml
[root@normal_12 u01]# cat /u01/mongodb_27019/stop_mongodb.sh
#!/usr/bin/env bash
/usr/local/mongodb/bin/mongod \
—config /u01/mongodb_27019/mongodb.yaml \
—shutdown
[root@normal_12 u01]# cat /u01/mongodb_27019/client_mongodb.sh
#!/usr/bin/env bash
/usr/local/mongodb/bin/mongo 10.10.10.12:27019
|
- 启动MongoDB
|
1
2
3
4
5
6
7
8
9
10
11
12
13
14
|
[root@normal_12 u01]# /u01/mongodb_27017/start_mongodb.sh
about to fork child process, waiting until server is ready for connections.
forked process: 3817
child process started successfully, parent exiting
[root@normal_12 u01]# /u01/mongodb_27018/start_mongodb.sh
about to fork child process, waiting until server is ready for connections.
forked process: 3841
child process started successfully, parent exiting
[root@normal_12 u01]# /u01/mongodb_27019/start_mongodb.sh
about to fork child process, waiting until server is ready for connections.
forked process: 3865
child process started successfully, parent exiting
|
- 初始化复制
|
1
2
3
4
5
6
7
8
9
10
11
12
13
14
15
16
17
18
19
20
21
22
23
24
25
26
27
28
29
30
31
32
33
34
35
36
37
38
39
40
41
42
43
44
45
46
47
48
49
50
51
52
53
54
55
56
57
58
59
60
61
62
63
64
65
66
67
68
69
70
71
72
73
74
75
76
77
78
79
80
81
82
83
84
85
86
87
88
89
90
91
92
93
94
95
96
97
98
99
100
101
102
103
104
105
|
[root@normal_12 u01]# /u01/mongodb_27017/client_mongodb.sh
MongoDB shell version: 3.2.5
connecting to: 10.10.10.12:27017/test
(test) 22:48:43>
(test) 22:48:45>rs.initiate()
{
“info2” : “no configuration specified. Using a default configuration for the set”,
“me” : “10.10.10.12:27017”,
“ok” : 1
}
(test) 22:48:43>
(test) 22:48:43>
(test) 22:48:56>rs.add(“10.10.10.12:27018”)
{ “ok” : 1 }
(test) 22:48:43>
(test) 22:48:43>
(test) 22:49:30>rs.add(“10.10.10.12:27019”)
{ “ok” : 1 }
(test) 22:48:43>
(test) 22:48:43>
(test) 22:49:33>rs.conf()
{
“_id” : “rs_12”,
“version” : 3,
“protocolVersion” : NumberLong(1),
“members” : [
{
“_id” : 0,
“host” : “10.10.10.12:27017”,
“arbiterOnly” : false,
“buildIndexes” : true,
“hidden” : false,
“priority” : 1,
“tags” : {
},
“slaveDelay” : NumberLong(0),
“votes” : 1
},
{
“_id” : 1,
“host” : “10.10.10.12:27018”,
“arbiterOnly” : false,
“buildIndexes” : true,
“hidden” : false,
“priority” : 1,
“tags” : {
},
“slaveDelay” : NumberLong(0),
“votes” : 1
},
{
“_id” : 2,
“host” : “10.10.10.12:27019”,
“arbiterOnly” : false,
“buildIndexes” : true,
“hidden” : false,
“priority” : 1,
“tags” : {
},
“slaveDelay” : NumberLong(0),
“votes” : 1
}
],
“settings” : {
“chainingAllowed” : true,
“heartbeatIntervalMillis” : 2000,
“heartbeatTimeoutSecs” : 10,
“electionTimeoutMillis” : 10000,
“getLastErrorModes” : {
},
“getLastErrorDefaults” : {
“w” : 1,
“wtimeout” : 0
},
“replicaSetId” : ObjectId(“572f51d8d37af8a0cf4cabf8”)
}
}
(test) 22:49:42>
(test) 22:49:48>
(test) 22:49:48>rs.isMaster()
{
“hosts” : [
“10.10.10.12:27017”,
“10.10.10.12:27018”,
“10.10.10.12:27019”
],
“setName” : “rs_12”,
“setVersion” : 3,
“ismaster” : true,
“secondary” : false,
“primary” : “10.10.10.12:27017”,
“me” : “10.10.10.12:27017”,
“electionId” : ObjectId(“7fffffff0000000000000001”),
“maxBsonObjectSize” : 16777216,
“maxMessageSizeBytes” : 48000000,
“maxWriteBatchSize” : 1000,
“localTime” : ISODate(“2016-05-08T14:49:54.119Z”),
“maxWireVersion” : 4,
“minWireVersion” : 0,
“ok” : 1
}
|
由于篇幅问题《MySQL应用架构优化-实时数据处理(2)》中将将讲述其他环境搭建过程
昵称: HH
QQ: 275258836
ttlsa群交流沟通(QQ群②: 6690706 QQ群③: 168085569 QQ群④: 415230207(新) 微信公众号: ttlsacom)
感觉本文内容不错,读后有收获?
逛逛衣服店,鼓励作者写出更好文章。
文章转载来自:ttlsa.com

