消息通信
扩展内部消息通信
Chrome扩展内的各页面之间的消息通信,有如下四种方式(以下接口省略chrome前缀)。
| 类型 | 消息发送 | 消息接收 | 支持版本 |
|---|---|---|---|
| 一次性消息 | extension.sendRequest | extension.onRequest | v33起废弃(早期方案) |
| 一次性消息 | extension.sendMessage | extension.onMessage | v20+(不建议使用) |
| 一次性消息 | runtime.sendMessage | runtime.onMessage | v26+(现在主流,推荐使用) |
| 长期连接 | runtime.connect | runtime.onConnect | v26+ |
目前以上四种方案都可以使用。其中extension.sendRequest发送的消息,只有extension.onRequest才能接收到(已废弃不建议使用,可选读Issue 9965005)。extension.sendMessage 或 runtime.sendMessage 发送的消息,虽然extension.onMessage 和 runtime.onMessage都可以接收,但是runtime api的优先触发。若多个监听同时存在,只有第一个响应才能触发消息的sendResponse回调,其他响应将被忽略,如下所述。
If multiple pages are listening for onMessage events, only the first to call sendResponse() for a particular event will succeed in sending the response. All other responses to that event will be ignored.
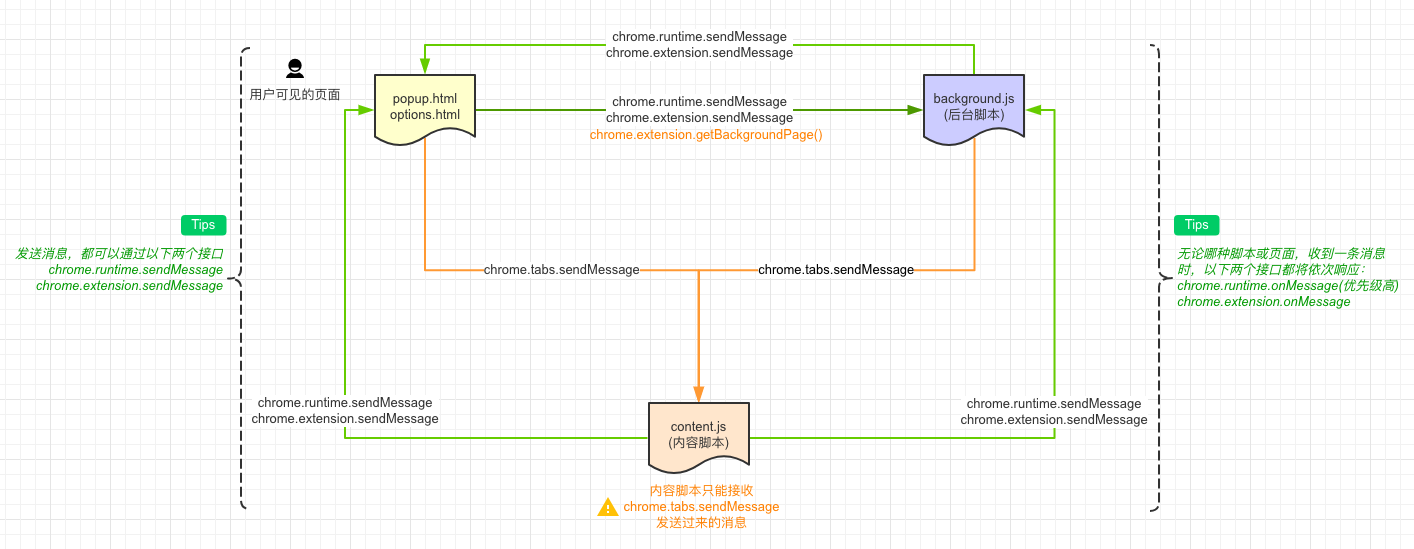
我们先看一次性的消息通信,它的基本规律如下所示。
图中出现了一种新的消息通信方式,即chrome.extension.getBackgroundPage,通过它能够获取background.js(后台脚本)的window对象,从而调用window下的任意全局方法。严格来说它不是消息通信,但是它完全能够胜任消息通信的工作,之所以出现在图示中,是因为它才是消息从popup.html到background.js的主流沟通方式。那么你可能会问了,为什么content.js中不具有同样的API呢?
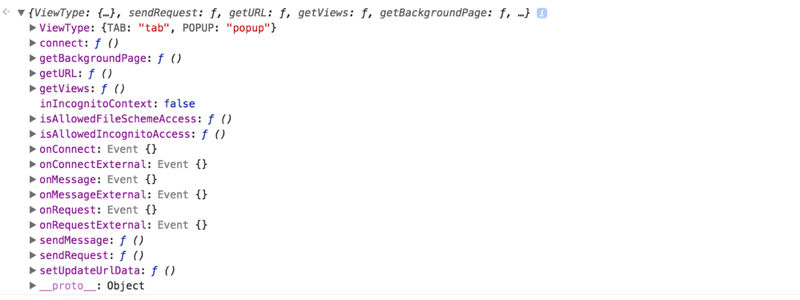
这是因为它们的使用方式不同,各自的权限也不同。popup.html或background.js中chrome.extension对象打印如下:
content.js中chrome.extension对象打印如下:
可以看出,前者包含了全量的属性,后者只保留少量的属性。content.js中并没有chrome.extension.getBackgroundPage方法,因此content.js不能直接调用background.js中的全局方法。
回到消息通信的话题,请看消息发送和监听的简单示例,如下所示:
// 消息流:弹窗页面、选项页面 或 background.js --> content.js
// 由于每个tab都可能加载内容脚本,因此需要指定tab
chrome.tabs.query( // 查询tab
  { active: true, currentWindow: true }, // 获取当前窗口激活的标签页,即当前tab
  function(tabs) { // 获取的列表是包含一个tab对象的数组
    chrome.tabs.sendMessage( // 向tab发送消息
      tabs[0].id, // 指定tab的id
      { message: 'Hello content.js' }, // 消息内容可以为任意对象
      function(response) { // 收到响应后的回调
        console.log(response);
      }
    );
  }
);

/* 消息流:
 * 1. 弹窗页面或选项页面 --> background.js
 * 2. background.js --> 弹窗页面或选项页面
 * 3. content.js --> 弹窗页面、选项页面 或 background.js
 */
chrome.runtime.sendMessage({ message: 'runtime-message' }, function(response) {
  console.log(response);
});

// 可任意选用runtime或extension的onMessage方法监听消息
chrome.runtime.onMessage.addListener( // 添加消息监听
  function(request, sender, sendResponse) { // 三个参数分别为①消息内容,②消息发送者,③发送响应的方法
    console.log(sender.tab ?
                "from a content script:" + sender.tab.url :
                "from the extension");
    if (request.message === 'Hello content.js'){
      sendResponse({ answer: 'goodbye' }); // 发送响应内容
    }
    // return true; // 如需异步调用sendResponse方法,需要显式返回true
  }
);
一次性消息通信API
上述涉及到的API语法如下:
- chrome.tabs.query(object queryInfo, function callback),查询符合条件的tab。其中,callback为查询结果的回调,默认传入tabs列表作为参数;queryInfo为标签页的描述信息,包含如下属性。
| 属性 | 类型 | 支持性 | 描述 |
|---|---|---|---|
| active | boolean | tab是否激活 | |
| audible | boolean | v45+ | tab是否允许声音播放 |
| autoDiscardable | boolean | v54+ | tab是否允许被丢弃 |
| currentWindow | boolean | v19+ | tab是否在当前窗口中 |
| discarded | boolean | v54+ | tab是否处于被丢弃状态 |
| highlighted | boolean | tab是否高亮 | |
| index | Number | v18+ | tab在窗口中的序号 |
| muted | boolean | v45+ | tab是否静音 |
| lastFocusedWindow | boolean | v19+ | tab是否位于最后选中的窗口中 |
| pinned | boolean | tab是否固定 | |
| status | String | tab的状态,可选值为loading或complete |
|
| title | String | tab中页面的标题(需要申请tabs权限) | |
| url | String or Array | tab中页面的链接 | |
| windowId | Number | tab所处窗口的id | |
| windowType | String | tab所处窗口的类型,值包含normal、popup、panel、appordevtools |
注:丢弃的tab指的是tab内容已经从内存中卸载,但是tab未关闭。
- chrome.tabs.sendMessage(integer tabId, any request, object options, function responseCallback),向指定tab下的content.js发送单次消息。其中tabId为标签页的id,request为消息内容,options参数从v41版开始支持,通过它可以指定frameId的值,以便向指定的frame发送消息,responseCallback即收到响应后的回调。
- chrome.runtime.sendMessage(string extensionId, any message, object options, function responseCallback),向扩展内或指定的其他扩展发送消息。其中extensionId为其他指定扩展的id,扩展内通信可以忽略该参数,message为消息内容,options参数从v32版开始支持,通过它可以指定includeTlsChannelId(boolean)的值,以便决定TLS通道ID是否会传递到onMessageExternal事件监听回调中,responseCallback即收到响应后的回调。
- chrome.runtime.onMessage.addListener(function callback),添加单次消息通信的监听。其中callback类似function(any message, MessageSender sender, function sendResponse) {…}这种函数,message为消息内容,sender即消息发送者,sendResponse用于向消息发送者回复响应,如果需要异步发送响应,请在callback回调中return true(此时将保持消息通道不关闭直到sendResponse方法被调用)。
综上,我们选用chrome.runtime api即可完美的进行消息通信,对于v25,甚至v20以下的版本,请参考以下兼容代码。
var callback = function(message, sender, sendResponse) {
  // Do something
});
var message = { message: 'hello' }; // message
if (chrome.extension.sendMessage) { // chrome20+
  var runtimeOrExtension = chrome.runtime && chrome.runtime.sendMessage ? 'runtime' : 'extension';
  chrome[runtimeOrExtension].onMessage.addListener(callback); // bind event
  chrome[runtimeOrExtension].sendMessage(message); // send message
} else { // chrome19-
  chrome.extension.onRequest.addListener(callback); // bind event
  chrome.extension.sendRequest(message); // send message
}
长期连接消息通信
想必,一次性的消息通信你已经驾轻就熟了。如果是频繁的通信呢?此时,一次性的消息通信就显得有些复杂。为了满足这种频繁通信的需要,Chrome浏览器专门提供了Chrome.runtime.connect API。基于它,通信的双方就可以建立长期的连接。
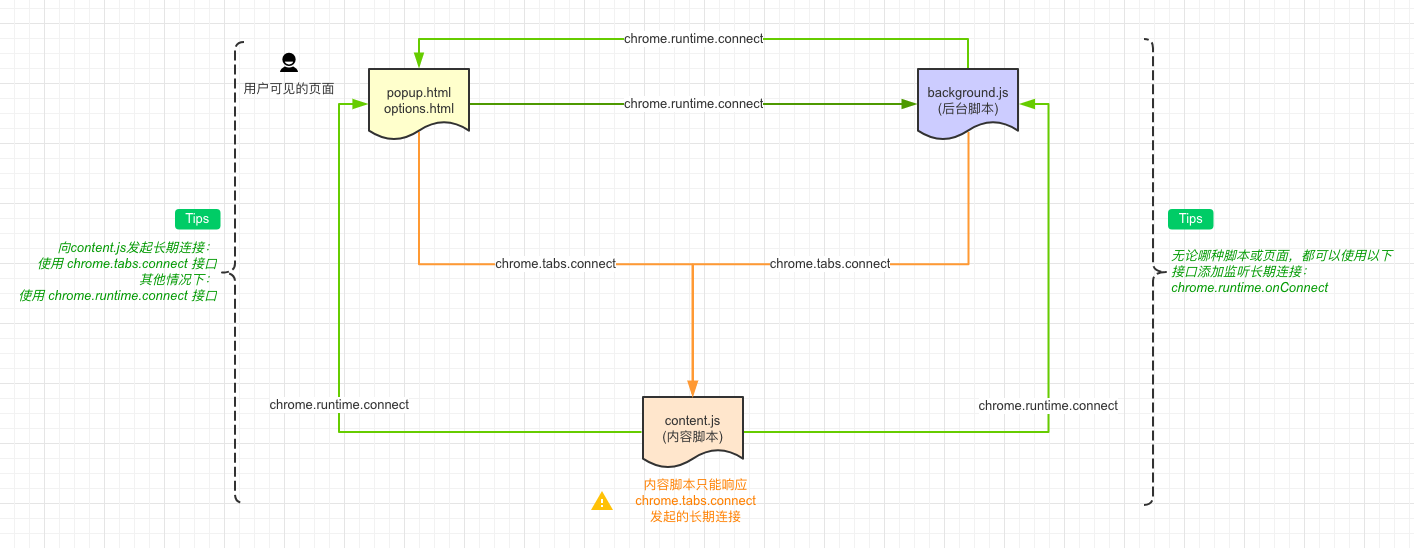
长期连接基本规律如下所示:
以上,与上述一次性消息通信一样,长期连接也可以在popup.html、background.js 和 content.js三者中两两之间建立(注意:无论何时主动与content.js建立连接,都需要指定tabId)。如下是popup.html与content.js之间建立长期连接的举例?。
// popup.html 发起长期连接
chrome.tabs.query(
  {active: true, currentWindow: true}, // 获取当前窗口的激活tab
  function(tabs) {
    // 建立连接,如果是与background.js建立连接,应该使用chrome.runtime.connect api
    var port = chrome.tabs.connect( // 返回Port对象
      tabs[0].id, // 指定tabId
      {name: 'call2content.js'} // 连接名称
    );
    port.postMessage({ greeting: 'Hello' }); // 发送消息
    port.onMessage.addListener(function(msg) { // 监听消息
      if (msg.say == 'Hello, who\'s there?') {
        port.postMessage({ say: 'Louis' });
      } else if (msg.say == "Oh, Louis, how\'s it going?") {
        port.postMessage({ say: 'It\'s going well, thanks. How about you?' });
      } else if (msg.say == "Not good, can you lend me five bucks?") {
        port.postMessage({ say: 'What did you say? Inaudible? The signal was terrible' });
        port.disconnect(); // 断开长期连接
      }
    });
  }
);

// content.js 监听并响应长期连接
chrome.runtime.onConnect.addListener(function(port) { // 监听长期连接,默认传入Port对象
  console.assert(port.name == "call2content.js"); // 筛选连接名称
  console.group('Long-lived connection is established, sender:' + JSON.stringify(port.sender));
  port.onMessage.addListener(function(msg) {
    var word;
    if (msg.greeting == 'Hello') {
      word = 'Hello, who\'s there?';
      port.postMessage({ say: word });
    } else if (msg.say == 'Louis') {
      word = 'Oh, Louis, how\'s it going?';
      port.postMessage({ say: word });
    } else if (msg.say == 'It\'s going well, thanks. How about you?') {
      word = 'Not good, can you lend me five bucks?';
      port.postMessage({ say: word });
    } else if (msg.say == 'What did you say? Inaudible? The signal was terrible') {
      word = 'Don\'t hang up!';
      port.postMessage({ say: word });
    }
    console.log(msg);
    console.log(word);
  });
  port.onDisconnect.addListener(function(port) { // 监听长期连接的断开事件
    console.groupEnd();
    console.warn(port.name + ': The phone went dead');
  });
});
控制台输出如下:
建立长期连接涉及到的API语法如下:
- chrome.tabs.connect(integer tabId, object connectInfo),与content.js建立长期连接。tabId为标签页的id,connectInfo为连接的配置信息,可以指定两个属性,分别为name和frameId。name属性指定连接的名称,frameId属性指定tab中唯一的frame去建立连接。
- chrome.runtime.connect(string extensionId, object connectInfo),发起长期的连接。其中extensionId为扩展的id,connectInfo为连接的配置信息,目前可以指定两个属性,分别是name和includeTlsChannelId。name属性指定连接的名称,includeTlsChannelId属性从v32版本开始支持,表示TLS通道ID是否会传递到onConnectExternal的监听器中。
- chrome.runtime.onConnect.addListener(function callback),监听长期连接的建立。callback为连接建立后的事件回调,该回调默认传入Port对象,通过Port对象可进行页面间的双向通信。Port对象结构如下:
| 属性 | 类型 | 描述 |
|---|---|---|
| name | String | 连接的名称 |
| disconnect | Function | 立即断开连接(已经断开的连接再次调用没有效果,连接断开后将不会收到新的消息) |
| onDisconnect | Object | 断开连接时触发(可添加监听器) |
| onMessage | Object | 收到消息时触发(可添加监听器) |
| postMessage | Function | 发送消息 |
| sender | MessageSender | 连接的发起者(该属性只会出现在连接监听器中,即onConnect 或onConnectExternal中) |
扩展程序间消息通信
相对于扩展内部的消息通信而言,扩展间的消息通信更加简单。对于一次性消息通信,共涉及到如下两个API:
- chrome.runtime.sendMessage,之前讲过,需要特别指定第一个参数extensionId,其它不变。
- chrome.runtime.onMessageExternal,监听其它扩展的消息,用法与chrome.runtime.onMessage一致。
对于长期连接消息通信,共涉及到如下两个API:
- chrome.runtime.connect,之前讲过,需要特别指定第一个参数extensionId,其它不变。
- chrome.runtime.onConnectExternal,监听其它扩展的消息,用法与chrome.runtime.onConnect一致。
发送消息可参考如下代码:
var extensionId = "oknhphbdjjokdjbgnlaikjmfpnhnoend"; // 目标扩展id
// 发起一次性消息通信
chrome.runtime.sendMessage(extensionId, { message: 'hello' }, function(response) {
  console.log(response);
});
// 发起长期连接消息通信
var port = chrome.runtime.connect(extensionId, {name: 'web-page-messages'});
port.postMessage({ greeting: 'Hello' });
port.onMessage.addListener(function(msg) {
  // 通信逻辑见『长期连接消息通信』popup.html示例代码
});
监听消息可参考如下代码:
// 监听一次性消息
chrome.runtime.onMessageExternal.addListener( function(request, sender, sendResponse) {
  console.group('simple request arrived');
  console.log(JSON.stringify(request));
  console.log(JSON.stringify(sender));
  sendResponse('bye');
});
// 监听长期连接
chrome.runtime.onConnect.addListener(function(port) {
  console.assert(port.name == "web-page-messages");
  console.group('Long-lived connection is established, sender:' + JSON.stringify(port.sender));
  port.onMessage.addListener(function(msg) {
    // 通信逻辑见『长期连接消息通信』content.js示例代码
  });
  port.onDisconnect.addListener(function(port) {
    console.groupEnd();
    console.warn(port.name + ': The phone went dead');
  });
});
控制台输出如下:
Web页面与扩展间消息通信
除了扩展内部和扩展之间的通信,Web pages 也可以与扩展进行消息通信(单向)。这种通信方式与扩展间的通信非常相似,共需要如下三步便可以通信。
首先,manifest.json指定可接收页面的url规则。
"externally_connectable": {
  "matches": ["https://developer.chrome.com/*"]
}
其次,Web pages 发送信息,比如说在 https://developer.chrome.com/extensions/messaging 页面控制台执行以上『扩展程序间消息通信』小节——消息发送的语句。
最后,扩展监听消息,代码同以上『扩展程序间消息通信』小节——消息监听部分。
至此,扩展程序的消息通信聊得差不多了。基于以上内容,你完全可以自行封装一个message.js,用于简化消息通信。实际上,阅读模式扩展程序就封装了一个message.js,IHeader扩展中的消息通信便基于它。
设置快捷键
一般涉及到状态切换的,快捷键能有效提升使用体验。为此我也为IHeader添加了快捷键功能。
为扩展程序设置快捷键,共需要两步。
- manifest.json中添加commands声明(可以指定多个命令)。
"commands": { // 命令 "toggle_status": { // 命令名称 "suggested_key": { // 指定默认的和各个平台上绑定的快捷键 "default": "Alt+H", "windows": "Alt+H", "mac": "Alt+H", "chromeos": "Alt+H", "linux": "Alt+H" }, "description": "Toggle IHeader" // 命令的描述 } },- background.js中添加命令的监听。
/* 监听快捷键 */
chrome.commands.onCommand.addListener(function(command) {
  if (command == "toggle_status") { // 匹配命令名称
    chrome.tabs.query({active: true, currentWindow: true}, function(tabs) { // 查询当前激活tab
      var tab = tabs[0];
      tab && TabControler(tab.id, tab.url).switchActive(); // 切换tab控制器的状态
    });
  }
});
以上,按下Alt+H键,便可以切换IHeader扩展程序的监听状态了。
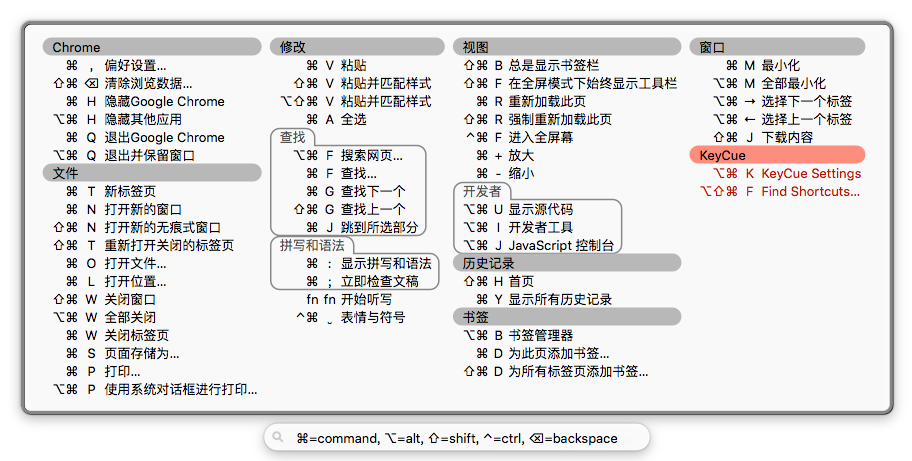
设置快捷键时,请注意Mac与Windows、linux等系统的差别,Mac既有Ctrl键又有Command键。另外,若设置的快捷键与Chrome的默认快捷键冲突,那么设置将静默失败,因此请记得绕过以下Chrome快捷键(KeyCue是查看快捷键的应用,请忽略之)。
添加右键菜单
除了快捷键外,还可以为扩展程序添加右键菜单,如IHeader的右键菜单。
为扩展程序添加右键菜单,共需要三步。
- 申请菜单权限,需在manifest.json的permissions属性中添加”contextMenus”权限。
"permissions": ["contextMenus"]- 菜单需在background.js中手动创建。
chrome.contextMenus.removeAll(); // 创建之前建议清空菜单 chrome.contextMenus.create({ // 创建右键菜单 title: '切换Header监听模式', // 指定菜单名称 id: 'contextMenu-0', // 指定菜单id contexts: ['all'] // 所有地方可见 });由于chrome.contextMenus.create(object createProperties, function callback)方法默认返回新菜单的id,因此它通过回调(第二个参数callback)来告知是否创建成功,而第一个参数createProperties则为菜单项指定配置信息。
- 绑定右键菜单的功能。
chrome.contextMenus.onClicked.addListener(function (menu, tab){ // 绑定点击事件
  TabControler(tab.id, tab.url).switchActive(); // 切换扩展状态
});
安装或更新
Chrome为扩展程序提供了丰富的API,比如说,你可以监听扩展安装或更新事件,进行一些初始化处理或给予友好的提示,如下。
/* 安装提示 */
chrome.runtime.onInstalled.addListener(function(data){
  if(data.reason == 'install' || data.reason == 'update'){
    chrome.tabs.query({}, function(tabs){
      tabs.forEach(function(tab){
        TabControler(tab.id).restore(); // 恢复所有tab的状态
      });
    });
    // 初始化时重启全局监听器 ...
    // 动态载入Notification js文件
    setTimeout(function(){
      var partMessage = data.reason == 'install' ? '安装成功' : '更新成功';
      chrome.tabs.query({active: true, currentWindow: true}, function(tabs) {
        var tab = tabs[0];
        if (!/chrome:\/\//.test(tab.url)){ // 只能在url不是"Chrome:// URL"开头的页面注入内容脚本
          chrome.tabs.executeScript(tab.id, {file: 'res/js/notification.js'}, function(){
            chrome.tabs.executeScript(tab.id, {code: 'notification("IHeader'+ partMessage +'")'}, function(log){
              log[0] && console.log('[Notification]: 成功弹出通知');
            });
          });
        } else {
          console.log('[Notification]: Cannot access a chrome:// URL');
        }
      });
    },1000); // 延迟1s的目的是为了调试时能够及时切换到其他的tab下,从而弹出Notification。
    console.log('[扩展]:', data.reason);
  }
});
以上,chrome.tabs.executeScript(integer tabId, object details)接口,用于动态注入内容脚本,且只能在url不是”Chrome:// URL”开头的页面注入。其中tabId参数用于指定目标标签页的id,details参数用于指定内容脚本的路径或语句,它的file属性指定脚本路径,code属性指定动态语句。若分别往同一个标签页注入多个脚本或语句,这些注入的脚本或语句处于同一个沙盒,即全局变量可以共享。
notification.js如下所示。
function notification(message) {
  if (!('Notification' in window)) { // 判断浏览器是否支持Notification功能
    console.log('This browser does not support desktop notification');
  } else if (Notification.permission === "granted") { // 判断是否授予通知的权限
    new Notification(message); // 创建通知
    return true;
  } else if (Notification.permission !== 'denied') { // 首次向用户申请权限
    Notification.requestPermission(function (permission) { // 申请权限
      if (permission === "granted") { // 用户授予权限后, 弹出通知
        new Notification(message); // 创建通知
        return true;
      }
    });
  }
}
最终弹出通知如下。
文章转载于:louis blog。作者:louis
原链接:http://louiszhai.github.io/2017/11/14/iheader/
